Serving sailors online since 1997
Installation Instructions - Boomkicker® Model K0400Recommended Installation Tools: Phillips Screwdriver, Fine Tooth Hacksaw.  1. General: To the right is a sketch of the Model K0400. Two fiberglass rods provide the force to support the boom. The boom sits in the sling between the rods and is held by a line to the gooseneck stop installed directly under the boom gooseneck. The length of the line controls teh initial height of the boom. To check the K0400 is the correct model, the minimum length is 26"(66cm) end pin to sling and the maximum weight it can support is approximately 14 lbs(6.3kgs) at the outboard end of the boom with the mainsail flaked. As shown the Boomkicker works by flexing and when straight, it is at the top of its travel. Note that the Boomkicker does not restrict the boom from rising higher . 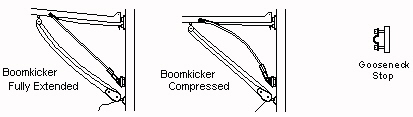 2. Installing Mast Bracket and Gooseneck Stop: The Boomkicker works best if the boom gooseneck is fixed in one spot on the mast. If the boom gooseneck can slide, then in the normal sailing position with the sail up, place a mark on the mast, indicating the lowest point of the gooseneck (Including any portion inside the luff groove). Then remove. Using the sail opening in the mast, first slide the mast bracket down to the vang bail, do not tighten. Next slide the top of the gooseneck stop to the mark and tighten. Reinsert the boom so against the gooseneck stop. If the boom gooseneck is fixed to the mast, the slides can be detached, slid past the gooseneck and reassembled. 3. Final Positioning: Using the main halyard, lift the aft end of the boom 6"- 8" (15cm - 20cm) above horizontal or normal sailing level . If the Boomkicker fits in the area above the vang, hold the sling around the under side of the boom and adjust the mast fitting location to make an angel between 40° and 45° with the boom. The sling line should be loose and is adjusted later. If the angle is much lower than 40°, then as the spring rods flex, they lose ability to hold the boom. Tighten the bracket in position and reattach the Boomkicker with clamp screws on top and the sling loop for the line, forward. If the Boomkicker is too long to fit in the area above the vang, or the angle is low, the spring rods can be cut down. Shorten the bottom of both rods (Use the provided hex-key to loosen rod clamp.) equal lengths of no more than 8" (20cm). A fine tooth hacksaw works best. Before tightening the rod clamp, make sure the rods are against the stops on the lower plate and Boomkicker labels are out. 4. Final Adjustments: Adjust the line between the sling and the gooseneck stop so the sling supports the boom. Since some initial stretch can be expected under load, slightly over tighten. Disconnect the halyard from the boom and press the boom down to flex the Boomkicker and test the force. Rods should flex freely upward and support the boom and mainsail without the boom sagging. Too much force will cause the boom to bow upwards. If less force is needed, optional smaller diameter rods are available either as exchange, ordered on the web or by phone. Thanks again for choosing Boomkicker! Patents: 5070802, 6062155 WARRANTY: The following is made in lieu of all warranties, expressed or implied. Seller's and manufacturer only obligation shall be to replace or repair such parts of the product proved to be defective for a period of five years. |